AMOD 3080
Description
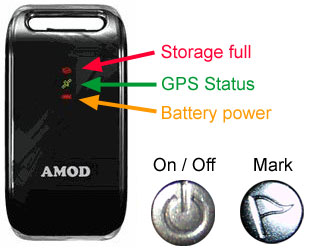
The AMOD 3080 has two buttons:
ON/OFF and MARK
Three separate indicator lights:
Red: Storage full, Green: GPS status, Amber: Battery power.
Basic operation
USB CONNECTION TO A COMPUTER
Standard mini-USB socket. The AMOD must be switched OFF before it is connected. It does not need to have batteries in it.SWITCH ON
Press the Power ON/OFF button until all three LED's blink simultaneously once. The green LED will stay constant while it is searching for a GPS signal.While the Green LED is blinking it is tracking GPS satellites and is logging GPS data.
If the green LED goes to constant on then you have lost GPS reception; adjust its orientation and position until the green LED is blinking again.
MARK
Depress the MARK button briefly to record a specific point on the track. The red LED will flash briefly to confirm the point has been recorded.LOW BATTERY
The amber battery power LED will start to blink when there is approximately 20% battery power remaining, but it will continue logging.When the battery power LED goes to constant, there is no longer sufficient power to continue logging and no further logging will take place until the batteries are replaced.
STORAGE FULL
The red LED will be constantly on and no further logging will take place. The device has a minimum 72 hours of track storage capacity so there is no excusable reason why you could ever reach this status.SWITCH OFF
Press the Power ON/OFF button until all three LED's blink simultaneously once and then all go out.BATTERIES
3 x AAA. Endurance with good quality alkaline batteries is around 10 hours and can be more.| Manufacturer warning: Inserting batteries the wrong way around will cause permanent damage to the device. |
Advanced operation
GPS RESET
If it is a long time since you used it, or you have moved to a different part of the World since you last used it, you are in clear view of the sky and it seems to be taking a very long time to start logging, then you may need to force a GPS reset. With the logger switched on, press the MARK button for about 5 seconds. It will then acquire new GPS Epheremis data and should start logging within a minute or two.LOGGER SETUP
There are six logging modes. Mode 1 is the device default and is also the setting you should use in championships.Note that there is an error in the manufacturer's user manual about how to enter setup mode and this is the correct method.
To enter setup mode, with the AMOD switched off, hold both the ON/OFF button and the MARK button simultaneously for about 5 seconds. All three LED's will blink five times and then stay constant, release both buttons; you have entered setup mode.
Cycle through each mode by pressing the MARK button. The LED which is lit or blinking indicates the mode you have selected.
| Mode | LED indication | NMEA data logging format | Min fix capacity | Min time capacity |
FRDL will work |
|
1 |
Red constant |
GGA/GSA/RMC/VTG @ 1 sec |
260,000 |
72 Hours |
YES (normal) |
|
2 |
Red blink |
Only RMC @ 1 sec |
1,040,000 |
288 Hours |
NO |
|
3 |
Green constant |
GGA/GSA/RMC/VTG @ 5 sec |
260,000 |
360 Hours |
YES |
|
4 |
Green blink |
Only RMC @ 5 sec |
1,040,000 |
1440 Hours |
NO |
|
5 |
Amber constant |
GGA/GSA/RMC/VTG @ 10 sec |
260,000 |
720 Hours |
YES |
|
6 |
Amber blink |
Only RMC @ 10 sec |
1,040,000 |
2880 Hours |
NO |
When you are in the desired mode, press the ON/OFF button until the device powers down. The next time you start it, it will be in the mode you selected.
| The normal setting for FRDL is the red LED at constant. If it is not at this setting, cycle through the modes until it is, and then power off to save that setting. |
Notes
- If no button is pressed after about one minute in setup mode, the current selected setting is saved and the device powers off.
- If the battery power is low, (Battery power LED blinking) then any attempt to enter setup mode will power off instead.
- As you cycle through the modes, then the currently selected mode is the one saved, so if the batteries are removed during setup mode then the next restart will be in the mode you were in at the moment of power loss and NOT the mode before you entered setup mode.
| Modes 2, 4 & 6 are NOT compatible with FRDL and should NOT be used in championships because the logger will not be recording any altitude or fix validity information. |
LOGGER RESET
To entirely wipe the logger memory, enter Setup mode and then press the MARK button for about 5 seconds when all three LED's will start to blink sequentially. When the MARK button is released the logger memory will be entirely wiped empty.
Notes
- After you have done this, enter setup mode again to ensure it is still in the mode you expect it to be in.
- It is easier to wipe the memory by simply deleting all files from the device with a file explorer while it is connected to a computer.